Saturday, September 25, 2010

Short and Sweet - I LOVE ICING FLOWERS!

I have a cake on order for tomorrow and naturally, I was able to incorporate some flowers into the cake's design. While these little buggers take a while to make, I have to tell you, they have solidified my absolute love of flowers and cakes and all things icing!

Enjoy!!!!

tamara


Can I tell you how wonderful a 14 in x 20 in cooling rack is? Thank you 40% off coupon from Michaels :)

Cookie Craft and the Art of Flooding

I have always wanted to know how to make sugar cookies that have that amazing hard coated icing on top that we all used to hoover off of the cookies (and leave the cookies behind).

You know the ones... They look something like this (courtesy of Bakerella's blog - as an aside, visit Bakerella's blog. It's amazing!!!!!!).
Photo is courtesy of Bakerella
 
This past weekend, I did some research on this technique and have learned that it is called 'flooding'. The idea behind the concept is simply that you outline the shape that you would like and then you 'flood' the outlined area with a runnier icing. Once dry, it's smooth and solid and oh so pretty!

The other thing that I learned through my 'flooding' research is that EVERYONE who has blogged about this concept, has suggested that you buy this book.
Cookie Craft by Valerie Patterson and Janice Fryer
I was debating whether or not I actually wanted to buy this book despite all of the hype about it. Did I really NEED another cook book? And even more so, did I need another cookie book? Well, I caved! I hunted down a copy in Toronto yesterday and it is now mine.

Before I bought the book, I had tried to create my own flooded cookies (last weekend actually) but I'm pretty sure that I put WAAAAAAAAY too much water in my flooding icing because they didn't dry in a solid flat coating, they had air bubbles in them. PLUS I made them in disgustingly vibrant colours that are reminiscent of an acid trip (or so I hear!). These are a collaboration of a few of the cookie artists who happened to have been at my house last weekend.

Unfortunately (or fortunately) you can't see the air bubbles, but I swear that they're there. 

Regardless, I bought the book, I bought the book, I bought the book!!!!!! I was going through it last night and I can barely contain my excitement about it. I swear the book was written for me :) So for now, we'll wait and see what comes out of the next few batches of cookies but I do truly hope that they're perfected by Halloween; I do have my Mom and baby brother's classes to bake for, plus my gals at work. Naturally, I will keep you all posted! 

Happy weekend!

Tamara

Sunday, September 19, 2010

Basketweave Cake

I have to admit, I really wasn't looking forward to having my final cake from cake class look like a basket. From the pictures that we saw, it definitely looked like something that my grandmothers would buy (not that there's anything wrong with that but it was just not me). But, my darling cake instructor, Gail, was very encouraging and suggested that we try it anyways. Well, I have to say, despite the large amount of work that goes into it, I really liked the way it looked in the end.
This is a close-up of the basketweave. The texture of the basket can be done with or without the ribbing.
And here, ladies and gents, is the finished product. I must admit, I am in love!
The flowers are all homemade in royal icing

I had some extra flowers and just had them poking out all around the basket because I can :)

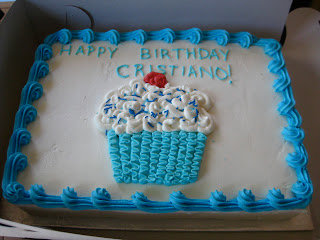
Cupcake Birthday Cake two ways

This was the first cake that I made in my Wilton Cake Decorating Class (Course #1 - Decorating Basics) at Michaels.  While the first one was very basic, I still adored it! 
This cake was a lemon cake with blueberry filling
While the first cake was a little on the small and basic side (though there is nothing wrong with that), I have also made it on a larger scale cake. This one was for my friend's son's 2nd birthday. I think I like it better on the larger cake :)
This cake was chocolate with a dark chocolate pastry cream in between the layers

Monday, September 6, 2010

Delicious veggies - Fantastic Saturday Morning Pt. 2

Over the last little while I have been trying to make a bit of an effort to eat more veggies. It definitely ties in to all those years of hearing one's mother going on and on about "you should eat your veggies...". It's funny how after 24 years, I'm starting to listen (Mum would be proud!)

As I continued my fantastic Saturday morning (post making jalapeño cheddar cornbread) with Mum, I decided to try out Martha Stewart's Marinated Cauliflower Salad. I had this salad a few weeks ago at Uncle Rick and Aunt Jane's place and immediately fell in love with it! It will definitely become a regular at our house and I hope you guys will test it out too! Not only is it delicious but it's a breeze to make! 

Here goes: 

Take one head of cauliflower and cut it into florets. 


Add the florets into a pot of boiling salted water for a few minutes and allow them to have a nice little swim (Note: the recipe states 2 minutes... Maybe it's just my stove, but I would probably recommend about 4-5 minutes. This will also depend on the side of your florets). This should be done in small batches so that you can evenly cook the little darlings!


Drain the florets and place them in whatever bowl you will be serving the salad. This can be a glass bowl, a Tupperware container or whatever floats your floret (HA! Alright, I promise, no more using the word floret, unless ABSOLUTELY necessary!).


Now here is where I would change the recipe a bit - it wouldn't be a Tamara-esque blog post if I followed the recipe to a T. The Goddess (aka Martha Stewart) suggests that you drizzle in 1/2 cup of olive oil when making the dressing (which is simply red onion, dijon mustard, salt, pepper, white wine vinegar and olive oil) however I would probably recommend either decreasing this to 1/4 of a cup or increasing all other ingredients except the red onion and olive oil to fix this. Me personally,  I would probably do a bit of both... decrease the olive oil and add some more of the other deliciousness but that's just the crazy gal that I am! Moving on... Once the dressing is emulsified, pour it over the cauliflower and add 2 teaspoons of capers that have been drained and rinsed.


Add some chopped parsley, toss the salad and refrigerate for at least a few hours. It is absolutely imperative to come back to the fridge every once in a while to stir the salad. Otherwise, you'll end up with cauliflower on the bottom of the bowl that absorbs the dressing and the florets (sorry!) on top, do not. I promise, you'll appreciate this step! 

And voila, ladies and gents, the deliciousness that is Martha Stewart's Marinated Cauliflower Salad.


I hope you all enjoyed your long weekend! 

Happy Cooking! 

t

Sunday, September 5, 2010

Jalapeño Cheddar Cornbread aka Fantastic Saturday Morning Pt. 1

This week has been a rough one to say the least. Between the loss of my cat, Rollie, and then my hard drive died and a whole hoopla of other things, I was very happy for Saturday morning to crawl around. I had tried to sleep in but my darling brain refused to let me so I got up and was finally feeling up to getting back in the kitchen. I have had two recipes saved on my Blackberry for the last few weeks that I have really wanted to try but haven't got around to it. Well yesterday morning was the perfect opportunity! 

Jalapeño Cheddar Cornbread is something that I have made in the past but I wanted to try a new recipe. I also happen to have gone to the farmers' market and got both some jalapeño peppers as well as some delicious local corn for an amazing price. The irony is that upon coming home, I discovered that my Mum had also purchased some corn so needless to say we were up to our ears in corn! (insert corny joke about ears of corn here!) I have found a few recipes but finally settled on Nestle's Jalapeño and Cheddar Corn Bread but with a bit of a twist. 

The recipe is pretty straight forward: Mix dry ingredients in one bowl. Mix wet ingredients in another bowl. Combine both wet & dry ingredients and add the jalapenos and cheese which looks something like this:


Don't forget to chop up the jalapeño peppers into little itty bitty bits of peppery confetti! I was a little worried about the recipe calling for 2 whole peppers but Mum convinced me to go for it. I am quite glad that I did.


Then grate the cheese and then it's time for the twist. I decided to cook one ear of corn and add the cooked kernels along with the cheese and jalapeños. 


Once everything is mixed together, fill your loaf pans (I used 4 medium ones and 2 tiny ones) and top with some more cheese.  When they come out, they are delightful little bundles of jalapeno happiness! 


I think what made these even better (beyond them being hot and delicious), was that I served these with honey butter. Honey butter is the easiest thing to make but it makes a world of difference. I took 1/4 cup of room temperature butter and added 1 1/2 tbsp honey and mixed it. You can do it in a mixer with larger quantities of butter and honey and then refrigerate but I only needed a little bit. 


And there you have it, my dears. Part 1 of 2 of the Fantastic Saturday Morning recipes! Stay tuned for part two coming shortly! 

Happy Long Weekend loves! 

Happy Cooking! 

tamara