Showing posts with label pink Himalayan sea salt. Show all posts

Wednesday, July 18, 2012

Heavenly little squares of joy!!!!

Have you ever come across a food where even the mere thought of it makes your mouth water? Tons of people have been jumping on the salted caramel bandwagon and I hate to jump in, but I'm in on this one - HEAD FIRST! It's the perfect balance of sweet and salty all in one.

The only thing that could possibly make salted caramel any better is by adding a shortbread cookie underneath it. That's right, ladies and gents, I am talked about Salted Caramel Shortbread Squares!!!!! I came across this recipe not too long ago on Erica's Sweet Tooth which is one of my favourite blogs of all time.
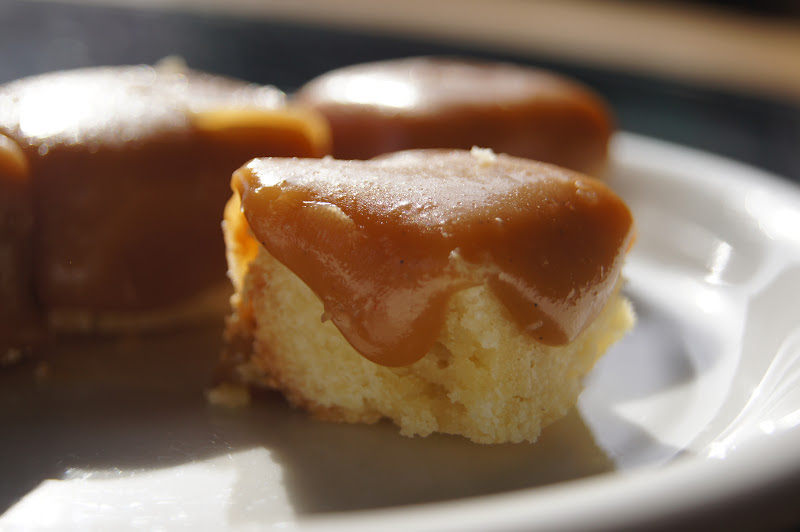


I'm melting on your behalf just looking at this photo!
Salted Caramel Shortbread 
Adapted from Erica's Sweet Tooth which was adapted from What's Gaby Cooking
For the shortbread layer:
10 tbsp unsalted butter, at room temperature
1/2 cup sugar
1/2 tsp salt
1 egg yolk
1-2/3 cups flour
For the caramel:
1 cup unsalted butter
1 cup light brown sugar
3/4 cup light corn syrup
2 tsp sea salt, plus more for sprinkling on top - I used pink Himalayan sea salt
4 tbsp sugar
4 tbsp heavy cream
1-1/2 tsp vanilla extract
Line an 9x9 pan with parchment paper, leaving some hanging over the sides to make removal easier.
In a large bowl, combine the butter, sugar, and salt with a pastry cutter or fork.  Add the egg yolk and continue mixing.  
Add the flour and use your hands to combine the dough until coarse crumbs form.  Transfer the dough into the prepared pan and press it down into one even layer.  
Refrigerate for 30 minutes.  Preheat oven to 350 degrees and bake for 25 minutes, until slightly golden brown.  Set aside to cool.  
For the caramel, combine the butter, brown sugar, corn syrup, salt, sugar, and heavy cream.  Bring to a boil and stir for about 5-10 minutes until caramel reaches the "soft ball stage" at around 230 degrees.  I didn't have a candy thermometer, so I just kept dropping droplets of the caramel in a glass of cold water and waited until it formed a ball in the water but that remained soft if I picked it up with my fingers.
Remove from heat, stir in the vanilla and pour caramel over the shortbread.  
Refrigerate for at least 3 hours, then sprinkle with sea salt and cut into squares.  Store caramels in the fridge until you're ready to eat them.


Notes:
  • For the love of all things holy, do not do what I did in my last batch which was to add the amount of salt that's intended for the caramel into the shortbread. While your guests will still think it's delicious, you, like myself, may feel that they are a tad too salty!
  • This recipe doubles very nicely so please feel free to try making more than one! 
Just to give you a few other images to salivate over, here you go... my gift to you :)
Yup! I took a bite out of this one!!! Just for you! I'm that girl!
Thanks to my guest photographer, Dina, for taking this shot!!!!
 Now go and make these! I promise you will not regret them at all!

Happy Baking!

t
xoxo

Wednesday, July 4, 2012

Rosemary Focaccia after a hectic week!!!!

The past few weeks have been busy as sin at work!!! I know it's officially peak travel season which for us means more complaints, but good lord, I swear these days never end sometimes. Have I mentioned that I work in the complaints department for an airline? Oh yes... This is why the kitchen is my solace! On top of work itself being crazy, we've been super busy the last few weekends so weekends just haven't been weekends. Thankfully, I'm finally on vacation and am working on getting rid of my cold and resting up a bit. I've managed to make it up to my grandparents cottage and hope that a little bit of r & r will be just what the doctor ordered. In celebration of the long weekend that just passed (Happy Canada Day & Happy 4th of July to our neighbours down south) and all the fun that accompanied it, I thought I would share with you one of my latest joys!!

A few weeks back, after work on a Friday night, I booted it out of the office and rushed home to the kitchen. This is typical Friday night after work activity because truly it's my stress relieving place... my happy place... and the place where I'm in my own bubble and don't have to answer to anyone else. This week in particular rosemary focaccia was the only thing on my mind.

Photo Credit: http://theartofeatingin.com/
Pretty much, the background info on this book is that Cathy decided to stop eating out in restaurants for 2 years (with a few exceptions) and this book documents her return to the kitchen and  making her own food. I don't think I've officially mentioned it here yet but I'm looking to move into my own place this coming December and as such will need to cut back on my dinners out and truly get back into the groove of cooking more!! While I got a little sidetracked with the book, the principles are so very important to me. I know that it is lovely to head out and not have to cook or clean up, but there is something so fantastic about knowing every little thing (including your effort) that went into your meal. Cathy went a little farther into foraging in Central Park than I would probably ever venture, the message is clear regardless. I've taken from this book my love of farmer's markets and visiting farms (I do believe that's as close to foraging as this city gal will make it). 

Back to my culinary adventure! I've made rosemary foccacia before and I love it! As corny as it is to say, there is NOTHING better than fresh bread. Nothing! Not chocolate, not shopping, nothing! Now why I endeavoured to start this mission at 7pm on a Friday night may be beyond you but it truly was worth staying up late for. I found the recipe on the Pastry Affair, which is one of my favourite blogs to read. Her pictures are GORGEOUS and her recipes delicious!  This recipe is interesting because you start off without adding the herbs so the dough has a bit of rising time first before it gets deflated and herb-ified (yup, that's a word)!
It starts to grow...
Then it grows some more...
 Delicious dimply thigh resembling dough meet herbs. Herbs meet dimply thigh resembling dough.


The joy of focaccia is that it is airy and is full of air pockets which makes it that much more delicious and soft. Once I started mixing the herbs in, you can see how stringy and full of air the dough really is! This is what excites me in my day to day life - airy dough pockets!


 This bread is worth all of the resting and the time it takes to make it - Even if you are awake until midnight waiting for the bread to come out of the oven so you can try a piece! 

Sprinkled with black pepper, salt and olive oil before baking!

Hello! I'm gorgeous!!!! Just take a little bit. I know you wanna...
Here's the recipe:

Rosemary Focaccia
adapted from the Pastry Affair

Ingredients:
4 1/2 to 5 cups all purpose flour
2 3/4 cups warm water
2 1/2 teaspoons active dry yeast
2 teaspoons coarse sea salt, plus extra for sprinkling (I used pink Himalayan sea salt)
3 tablespoons fresh chopped rosemary
1/3 cup and 2 tablespoons extra-virgin olive oil  
1 teaspoon freshly cracked pepper
  1. In a large mixing bowl, mix together bread flour, water, and active dry yeast. Cover the bowl with plastic wrap and allow to rise in a warm, dry place for 1 1/2 to 2 hours, or until dough has tripled in volume and is bubbly.
  2. If using a stand mixer, attach dough hook and mix in salt and rosemary. Knead dough for an additional 5-7 minutes. Dough will be loose and sticky.
  3. If you do not have a stand mixer, turn dough out on a heavily floured surface and, using your hands or even a wooden spoon, attempt to knead the dough. Mix in salt and rosemary at this time. Add flour as needed and fold dough in half in all directions if it will not cooperate enough to knead. Dough will be very difficult to handle, but try to incorporate as little flour as possible (it results in a softer bread).
  4. Cover with plastic wrap and allow to rise for another hour, or until doubled in volume.
  5. In a 13 by 17-inch rimmed baking pan, evenly distribute 2 tablespoons of olive oil to coat pan. Turn out down onto pan and, with oiled hands, pull dough to the edges of the pan. The dough may resist at first, but with a little patience it will stay put. Cover dough with a clean dish towel and allow to rise for an additional 15-20 minutes.
  6. Preheat oven to 400 degrees F (205 degrees C).
  7. Using your fingertips, poke a couple dozen holes into the top of the bread. Pour remaining olive oil evenly over bread and sprinkle with a light dusting of coarse sea salt, rosemary, and freshly cracked pepper. Bake for 30-40 minutes, or until golden brown. Let cool slightly in pan before serving warm or at room temperature.
I hope you all have the chance to make this recipe!!!!! 

Happy Baking!
t
Worth every second!

Wednesday, November 16, 2011

Homemade Pretzel Bites

It was in fact a happy Saturday to meeeeee this past weekend! My darling Jen stayed over on Friday night and on Saturday morning I woke up and wanted nothing more than to make some homemade pretzel bites. Who knows why I get these strange cravings but once they hit, they don't disappear!

So I took a little browse through my bookmarked recipes (my goodness, there are A LOT of recipes. It may be time to start printing them off!) and I managed to find a few recipes. Originally, I was going to use one that looked good but it required the pretzel bites to be both boiled and then baked. Frankly, it seemed a little complicated for bites of pretzel dough. Then I came across a second recipe that I'd bookmarked and I knew I'd found the right one.

This recipe was from Mel's Kitchen Cafe and the recipe was so straightforward and easy that you can't help but want to make these delicious bites of the Gods on a daily basis! The pretzels come out with a crisp crust but are so supple in the middle that  you can't help but feel that you've died and gone to pretzel heaven.

The process is quite simple:

Toss all ingredients in the bowl of your mixer fitted with the dough hook. After about 5 minutes of mixing you will have a lovely smooth dough that needs to do a bit of relaxing. I put mine in a bowl greased with olive oil and let it rest for an hour. It rose quite a bit when the hour was up and I proceeded to turn the dough out on to my trusty granite slab that I greased slightly. 
I LOVE DOUGH!
The dough is then divided into 4 pieces and rolled into logs (I love my new dough cutter)
Each log is then cut into 6-8 pieces. Next time I make this, I will make each log cut 12-14 pieces because these were HUGE!
Little bites resting before going in the oven. They have been dipped in a water/baking soda mix & then sprinkled with salt
Lovely pink Himalayan sea salt. Do not be afraid of the 500F temperature that you'll have to set your oven to.
Look at what popped out of the oven!
A close-up!
I served them with a spicy tomato sauce! Look at all of the layers inside the dough!
All in all, I will be making these again and soon at that! I'm thinking they will be making an appearance at our family's Christmas party in a month's time. Like I said, I will probably make them smaller because they do grow even more when they're resting prior to baking.

I hope you all are having a great week thus far!

Keep smiling and happy baking!

Tamara