Tuesday, July 31, 2012

Baby Shower Cupcakes with Strawberry Buttercream


Photo courtesy of Zazzle.com

I'm just going to come out and say it! I LOVE STRAWBERRIES!!! With the crazy weather we had at the end of the winter and the beginning of the spring, the strawberry crops haven't fared well at all this year. This in itself breaks my heart but I do enjoy when I can get my hands on some tasty berries regardless. In celebration of the delicious berries that I picked up at Strawberry Creek Farm a few days ago on the way home from the cottage, I thought that this was the perfect opportunity to try out a recipe that has scared the pants off of me for the last 3 or so years... Strawberry Meringue Buttercream!!!!

Let me explain that typically I use a few different kinds of frosting. When I bake cupcakes and know that I will be transporting them all over the place, I use a recipe that can withstand temperature changes. Other times I use a simple recipe of butter, icing sugar and whatever flavouring I'm looking to achieve. I rarely make a traditional buttercream that requires egg whites to be heated and then whipped for ages before adding a ton of butter. These buttercreams are called meringue buttercreams. I have successfully made a chocolate one before and have tried the strawberry one before but needless to say, I ended up crying because it flopped... or so I thought....

Dina, a friend of ours, first introduced me to this strawberry meringue buttercream and so what better place to start than in her kitchen watching her make it. After watching the master at work, I realized that the last time I made this strawberry buttercream, if I'd just kept beating it, I would most likely have been successful!!! (UGH! Good to know NOW!) Regardless, the ever gracious Dina showed me everything I needed to know and truly boosted my confidence to try again. Thus, when my darling friend Katie (from work) asked me to bake cupcakes for a baby shower she was hosting, I knew that the strawberry meringue buttercream needed to happen.
I apologize for the over exposure but I wanted to show you the cutest baby bottles that I found to top the cuppies!!!
While I won't go into great detail on the recipe, I will summarize the process:
  • Puree strawberries & strain (or not)
  • Heat egg whites and sugar to a point where you can only hold your finger in them for 10 seconds before wanting to cry
  • Whip the egg whites (hopefully with a stand mixer) until cool and huge and fluffy!
  • Add butter in very small additions. When the frosting looks like it's curdled, keep whipping!!!!!
  • Add your strawberries (and a tiny bit of strawberry flavouring)
  • Savour the deliciousness that you have just slaved over!
 I won't lie, I almost cried!! These cupcakes turned out beautifully!!!! On top of their appearance, they tasted heavenly. I made half of them just my plain vanilla cupcakes and the other half were red velvet. The strawberry buttercream was delicious on both!!!

Welcome to my heaven:
 We can all die and go to strawberry buttercream heaven! A special thank you to Dina for making sure that I was comfy with this recipe!!! You rock my socks, lady!!!!

Happy Baking!!!

T

xoxo

Tuesday, July 24, 2012

Oakland Raiders Birthday Cake

My darling friend, Danielle, emailed me a while back about making a cake for her boyfriend's birthday. Her only requests were that it showcase the Oakland Raiders' logo and team colours and with those requests I went to town! This cake was a pleasure, albeit a little stressful, to make but in the end, I was so pleased with it!!!
Thanks Danielle for having thought of me and for letting me be part of the party!!!

For any order inquiries, please contact novicegoddess@hotmail.com.

xoxo
t

Wednesday, July 18, 2012

Heavenly little squares of joy!!!!

Have you ever come across a food where even the mere thought of it makes your mouth water? Tons of people have been jumping on the salted caramel bandwagon and I hate to jump in, but I'm in on this one - HEAD FIRST! It's the perfect balance of sweet and salty all in one.

The only thing that could possibly make salted caramel any better is by adding a shortbread cookie underneath it. That's right, ladies and gents, I am talked about Salted Caramel Shortbread Squares!!!!! I came across this recipe not too long ago on Erica's Sweet Tooth which is one of my favourite blogs of all time.


I'm melting on your behalf just looking at this photo!
Salted Caramel Shortbread 
Adapted from Erica's Sweet Tooth which was adapted from What's Gaby Cooking
For the shortbread layer:
10 tbsp unsalted butter, at room temperature
1/2 cup sugar
1/2 tsp salt
1 egg yolk
1-2/3 cups flour
For the caramel:
1 cup unsalted butter
1 cup light brown sugar
3/4 cup light corn syrup
2 tsp sea salt, plus more for sprinkling on top - I used pink Himalayan sea salt
4 tbsp sugar
4 tbsp heavy cream
1-1/2 tsp vanilla extract
Line an 9x9 pan with parchment paper, leaving some hanging over the sides to make removal easier.
In a large bowl, combine the butter, sugar, and salt with a pastry cutter or fork.  Add the egg yolk and continue mixing.  
Add the flour and use your hands to combine the dough until coarse crumbs form.  Transfer the dough into the prepared pan and press it down into one even layer.  
Refrigerate for 30 minutes.  Preheat oven to 350 degrees and bake for 25 minutes, until slightly golden brown.  Set aside to cool.  
For the caramel, combine the butter, brown sugar, corn syrup, salt, sugar, and heavy cream.  Bring to a boil and stir for about 5-10 minutes until caramel reaches the "soft ball stage" at around 230 degrees.  I didn't have a candy thermometer, so I just kept dropping droplets of the caramel in a glass of cold water and waited until it formed a ball in the water but that remained soft if I picked it up with my fingers.
Remove from heat, stir in the vanilla and pour caramel over the shortbread.  
Refrigerate for at least 3 hours, then sprinkle with sea salt and cut into squares.  Store caramels in the fridge until you're ready to eat them.


Notes:
  • For the love of all things holy, do not do what I did in my last batch which was to add the amount of salt that's intended for the caramel into the shortbread. While your guests will still think it's delicious, you, like myself, may feel that they are a tad too salty!
  • This recipe doubles very nicely so please feel free to try making more than one! 
Just to give you a few other images to salivate over, here you go... my gift to you :)
Yup! I took a bite out of this one!!! Just for you! I'm that girl!
Thanks to my guest photographer, Dina, for taking this shot!!!!
 Now go and make these! I promise you will not regret them at all!

Happy Baking!

t
xoxo

Tuesday, July 10, 2012

Buttermilk Apple Muffins..from a while ago!

I don't actually want to acknowledge how long I've been partially writing this post. Let's just say that my apples were purchased in the fall and the muffins were baked then too!!! Ah well, better late than never! 

I know that I've mentioned before that I adore apples! I think they're fantastic and when they are in season, they make my life better! The only thing that made apples better was spending the day with this little bugger while hunting for perfect pumpkins and buying apples too:

 
This is my youngest brother Jordan! He was vital in helping me find just the right apples for these delicious muffins. This kid was a trooper as we hiked through the pumpkin patch and froze our buns off trying to find perfect pumpkins. It was a day of broken pumpkins and cold weather but we had so much fun! Anywhoo, back to the muffins!

The 20 Minute Supper Club, which is now owned and operated by Canadian Family, still has some of the best recipes that I've seen both for meals as well as snacks. I decided to try their recipe for Buttermilk Apple Cake but I decided to make them as Buttermilk Apple muffins instead. I'm a big fan of muffins for breakfast or a snack and even more if they're fruit filled. These muffins fit the bill all around. 

Gorgeous, heavenly apples
The filling for between the layers of dough.
The recipe calls for leaving the skin on... I will next time but I peeled most of mine this time around. So there was slightly less fiber in these than the recipe calls for.
I love all of the good bits in the batter - flax, whole wheat flour and buttermilk. Be sure not to overmix the batter!
Fill the muffin cups half way, add some of the brown sugar topping, and then add another dollop of batter on top!


These muffins aren't overly sweet but the apples help make them delicious!!!
I found that this recipe makes 12 muffins which is just perfect. I also think next time I'll add more apples. 

Buttermilk Apple Cake

Ingredients
  • 1/4 Cups butter, softened
  • 2/3 Cups packed brown sugar
  • 1 1/2 Cups buttermilk
  • 1 Cup all-purpose flour
  • 1 Cup whole-wheat flour
  • 1 tablespoon flaxseed meal
  • 1 teaspoon baking powder
  • 1 teaspoon baking soda
  • 2 teaspoons cinnamon
  • 1/4 teaspoon nutmeg
  • 1/2 teaspoons salt
  • 6 apples, finely chopped (leave skin on for more fibre) - I used macintosh apples
  • 1/4 Cups packed brown sugar
  • 2 teaspoons cinnamon
  •  
    1. In a large bowl, beat together butter and sugar until combined. Beat in buttermilk.
    2. In another bowl, combine flours, flax, baking powder, baking soda, cinnamon, salt. Add to buttermilk mixture and stir well. Add apples and mix until combined. Fill each lined muffin cup just slightly less than halfway with the batter.
    3. In a small bowl, combine brown sugar and cinnamon and sprinkle onto batter in each muffin cup. Top each muffin with a dollop of remaining batter.
    4. Bake at 350°F for about 30 minutes or until toothpick inserted in centre comes out clean. Let cool in pan.
    Happy Baking Everyone!!!
    t

    Saturday, July 7, 2012

    What am I?

    I spent a slightly hectic afternoon (yesterday) and morning (today) in the kitchen working on a cupcake order that was tons of fun!!!! However, while I was waiting for my frosting to set up, I happened to have had a chance to whip up a batch of something else... I'm going to keep it a secret for now as it's not quite complete yet but I thought I would throw this out there to see if anyone could figure out what I'm making...

    So tell me, oh faithful readers, what am I?
    P.S. Anyone living in my house (aka who is able to go into the fridge right now) is not eligible to guess!

    I'll keep you posted!

    Happy Saturday!
    t

    Wednesday, July 4, 2012

    Rosemary Focaccia after a hectic week!!!!

    The past few weeks have been busy as sin at work!!! I know it's officially peak travel season which for us means more complaints, but good lord, I swear these days never end sometimes. Have I mentioned that I work in the complaints department for an airline? Oh yes... This is why the kitchen is my solace! On top of work itself being crazy, we've been super busy the last few weekends so weekends just haven't been weekends. Thankfully, I'm finally on vacation and am working on getting rid of my cold and resting up a bit. I've managed to make it up to my grandparents cottage and hope that a little bit of r & r will be just what the doctor ordered. In celebration of the long weekend that just passed (Happy Canada Day & Happy 4th of July to our neighbours down south) and all the fun that accompanied it, I thought I would share with you one of my latest joys!!

    A few weeks back, after work on a Friday night, I booted it out of the office and rushed home to the kitchen. This is typical Friday night after work activity because truly it's my stress relieving place... my happy place... and the place where I'm in my own bubble and don't have to answer to anyone else. This week in particular rosemary focaccia was the only thing on my mind.

    Photo Credit: http://theartofeatingin.com/
    Pretty much, the background info on this book is that Cathy decided to stop eating out in restaurants for 2 years (with a few exceptions) and this book documents her return to the kitchen and  making her own food. I don't think I've officially mentioned it here yet but I'm looking to move into my own place this coming December and as such will need to cut back on my dinners out and truly get back into the groove of cooking more!! While I got a little sidetracked with the book, the principles are so very important to me. I know that it is lovely to head out and not have to cook or clean up, but there is something so fantastic about knowing every little thing (including your effort) that went into your meal. Cathy went a little farther into foraging in Central Park than I would probably ever venture, the message is clear regardless. I've taken from this book my love of farmer's markets and visiting farms (I do believe that's as close to foraging as this city gal will make it). 

    Back to my culinary adventure! I've made rosemary foccacia before and I love it! As corny as it is to say, there is NOTHING better than fresh bread. Nothing! Not chocolate, not shopping, nothing! Now why I endeavoured to start this mission at 7pm on a Friday night may be beyond you but it truly was worth staying up late for. I found the recipe on the Pastry Affair, which is one of my favourite blogs to read. Her pictures are GORGEOUS and her recipes delicious!  This recipe is interesting because you start off without adding the herbs so the dough has a bit of rising time first before it gets deflated and herb-ified (yup, that's a word)!
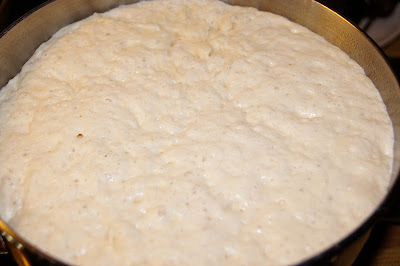
    It starts to grow...
    Then it grows some more...
     Delicious dimply thigh resembling dough meet herbs. Herbs meet dimply thigh resembling dough.


    The joy of focaccia is that it is airy and is full of air pockets which makes it that much more delicious and soft. Once I started mixing the herbs in, you can see how stringy and full of air the dough really is! This is what excites me in my day to day life - airy dough pockets!


     This bread is worth all of the resting and the time it takes to make it - Even if you are awake until midnight waiting for the bread to come out of the oven so you can try a piece! 

    Sprinkled with black pepper, salt and olive oil before baking!

    Hello! I'm gorgeous!!!! Just take a little bit. I know you wanna...
    Here's the recipe:

    Rosemary Focaccia
    adapted from the Pastry Affair

    Ingredients:
    4 1/2 to 5 cups all purpose flour
    2 3/4 cups warm water
    2 1/2 teaspoons active dry yeast
    2 teaspoons coarse sea salt, plus extra for sprinkling (I used pink Himalayan sea salt)
    3 tablespoons fresh chopped rosemary
    1/3 cup and 2 tablespoons extra-virgin olive oil  
    1 teaspoon freshly cracked pepper
    1. In a large mixing bowl, mix together bread flour, water, and active dry yeast. Cover the bowl with plastic wrap and allow to rise in a warm, dry place for 1 1/2 to 2 hours, or until dough has tripled in volume and is bubbly.
    2. If using a stand mixer, attach dough hook and mix in salt and rosemary. Knead dough for an additional 5-7 minutes. Dough will be loose and sticky.
    3. If you do not have a stand mixer, turn dough out on a heavily floured surface and, using your hands or even a wooden spoon, attempt to knead the dough. Mix in salt and rosemary at this time. Add flour as needed and fold dough in half in all directions if it will not cooperate enough to knead. Dough will be very difficult to handle, but try to incorporate as little flour as possible (it results in a softer bread).
    4. Cover with plastic wrap and allow to rise for another hour, or until doubled in volume.
    5. In a 13 by 17-inch rimmed baking pan, evenly distribute 2 tablespoons of olive oil to coat pan. Turn out down onto pan and, with oiled hands, pull dough to the edges of the pan. The dough may resist at first, but with a little patience it will stay put. Cover dough with a clean dish towel and allow to rise for an additional 15-20 minutes.
    6. Preheat oven to 400 degrees F (205 degrees C).
    7. Using your fingertips, poke a couple dozen holes into the top of the bread. Pour remaining olive oil evenly over bread and sprinkle with a light dusting of coarse sea salt, rosemary, and freshly cracked pepper. Bake for 30-40 minutes, or until golden brown. Let cool slightly in pan before serving warm or at room temperature.
    I hope you all have the chance to make this recipe!!!!! 

    Happy Baking!
    t
    Worth every second!