Saturday, December 1, 2012

A foodie wine adventure

The current weather is leaving much to be desired except for snuggling up on the couch, under the covers with a book/movie and a cup of tea. It's starting to get ridiculously cold and snow is starting to fall too which I'm not very happy about at all. While trying to not look outside, I thought this would be a perfect time to share photos from an adventure I took in September with my friend Jen.

I don't think I've ever mentioned it on the blog but I'm not a really big drinker. I like my girlie martinis:
Photo credit: Vancouver Pedersen's
I will also indulge in the occasional glass of wine but I've never been very big into it. However, when over at a friend's having dinner and discovered wine from a small winery in Beamsville, Ontario, called Organized Crime. Naturally, I had to go and find some more of their 2011 Riesling because it was heavenly. Thus, on a spontaneous Saturday afternoon, Jen and I loaded into the car and headed off to Beamsville. The joy for me is that the winery is about a 40 minute drive from my place which makes it much too convenient for me to visit on a whim.

The weather was beautiful and the scenery was breathtaking!!
A Pumpkin and tomato patch at the side of the road
Vineyard from the car
Vines at Organized Crime
Red Grapes at Organized Crime
We have arrived!!!!!
You guys know how much I LOVE things in neat rows!!!
More grapes!
Green grapes for white wine!!!! My favourite!
The view from Organized Crime's seating area! What a gorgeous day!
View from Angel's Gate Winery.
Angel's Gate
Angel's Gate's store and restaurant
Jen eager for more tastings and wine buying
How gorgeous is this!?!?


Such a pretty gate... one may even say an angelic gate?
On the road out of Angel's Gate
The most amazing view!!!
If you've ever have the opportunity to visit these wineries, I can't tell you how much I'd recommend it. The street where Organized Crime and Angel's Gate are located has a whole bunch of wineries on it which makes it so easy to find quite the collection of wines all in the same area. Also, if you're lucky enough to have amazing weather like we did, make sure you stop somewhere to eat and bask in the glorious weather!!!!

I hope you're all keeping warm and cozy on these cold nights. I've got so many more adventures to tell you all about and can't wait to share them with all of you!

Happy Friday All!

t

Sunday, October 28, 2012

Roast Chicken for 4... or 2... or 1!

A few weeks back (oh boy, it's actually been 2 months!!!) I was home alone for a whole week and let me tell you it was heavenly! I became a bit of a Suzie Homemaker and spent my time baking, cooking, sewing, knitting and all in all just having a pretty amazing time doing whatever my little heart desired. On one of those lovely nights, I made the most delicious roast chicken dinner for me, myself and I. This meal could definitely feed multiple people or a smaller number of people for multiple meals.

A roast chicken is truly one of the easiest yet most satisfying things to make. It's so versatile because you can customize it to exactly how you like your chicken to taste. Like things more spicy, DONE! Want some herb flavoured chicken, DONE! Not sure what to do with the spices in your cupboard, slap them on a chicken and roast it! It is one of those things where you can't really go wrong with the seasoning. I know that most times it's very very easy to simply pick up a pre-made roast chicken for dinner but in just over an hour's time (depending on the size of your chicken), you can have a gorgeous little roasted bird waiting for you without all of the other 'funny bits' that are sometimes included in store-bought roast chickens. Also, if buying a bulk package of roast chickens (Costco sells 3 packs), you are definitely saving in the long run. Throw the extras in the freezer and you've got a whole bunch of meals ahead of you. You could even pre-season your chickens before freezing which would make them THAT much easier.

Years ago, my Mum attended a Pampered Chef party and came home with a bundt pan with a covered centre (aka no hole in the middle). On the particular night that I was roasting my little chicken, I decided that I would use whatever spices we had in the cupboard but I also wanted to try a new veggie with it. So I picked up a lovely little acorn squash and added it to my sweet potatoes for some variety. Acorn squash is quite lovely, I will admit and will definitely make more frequent appearances in my kitchen in the coming months.
This is the point where I had cut up all my veggies and put them in the bundt pan before I realized that I forgot to spice them up... UGH! Into the bowl they go for a little spice bath!
This was the cute little chicken that I found at the grocery store.
Pop your little wonder chicken on the center tube of the bundt pan so she stands up all proud and such
My spice blend of choice for that night... But I truly say do what feels good!
All dressed up and ready to party!!!
Add the veggies around your chicken before baking. Everything will cook and mix and be amazing!
HEAVEN!!!

Let it rest for a few minutes after baking (I covered it with some foil)
Once all veggies are removed from the bundt pan, take the liquid in the bottom and heat it quickly in a sauce pan. It will make a glorious sauce that just makes life make sense again.
Serve with broccoli and whatever else rocks your boat! Enjoy the sauce too!!!!
I promise as much as this seems both like a labour intensive dish but it isn't and it is worth every second of it. Try this! Try this! Try this!

I'm sorry for my distance lately.... As always the insanity of every day life has caught up with me but I'm trying to get a bunch of posts ready for the next few weeks!!! Plus, Christmas baking is already being planned and I can't wait to share it with you all!

Hope you're having wonderful Saturday nights!

xoxo

T

Monday, September 10, 2012

Chocolate Cupcakes on a lazy Sunday evening!

A few weeks back, on a rare occasion, all of the grown children of my household were home (barring 1 girlfriend - T-bear, you were missed terribly!!). This sort of thing never happens as we're all in our 20s and usually all over the place. My brother is typically at school somewhere in the US, my step-sister in past years has been at school in Kingston, and I'm just all over the place. Needless to say this was a big deal!

While we were prepping dinner and catching up on what was going on with everyone, my step-sister mentioned that she had a craving for a simple chocolate cake with plain chocolate frosting. Apparently this is hard to come by which I find to be insanity! How can no one make just simple chocolate cake with chocolate frosting any more? Have we really become so entertained by all of the crazy cake flavours out there that we've forgotten that sometimes the simplest things are the best? Before I go off on a huge tangent about simplicity in the kitchen, I digress!

So to help the poor girl out in her quest for chocolate cake, I decided to whip up a batch of Martha Stewart's One Bowl Chocolate Cupcakes. I was fascinated by the claim of these actually only using one bowl and truth be told, it worked... Well... one bowl and one sifter but still! This batter takes all of 5 minutes to mix and produces results comparable to cake mix without all the added grossness that goes into mixes. The ingredients were all found in my kitchen and I think it's safe to say that they would be found in most other kitchens too. I cannot stress this enough... GO MAKE THESE CUPCAKES! You will not regret it one single bit! 
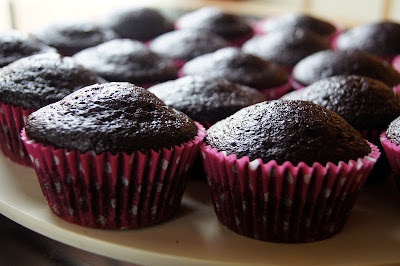
These little beauties have the most gorgeous shiny tops ever. They are good enough to eat sans frosting even!
The cupcake liners don't hurt either! You can never go wrong with polka dots!


Once we had the cupcakes made, it was time to frost these babies up with a simple chocolate frosting. My frosting was made with butter, icing sugar, a few tablespoons of cocoa powder, some vanilla bean paste (or you could use vanilla extract) and a touch of milk. I know that usually I am religious at piping my frosting but sometimes you have to live a little and just do what feels right. These were not cupcakes for an order, they were cupcakes for a family dinner in the backyard while playing (slightly intoxicated) ring toss on a 6 foot tall Eiffel tower.

All I can say is YUMMMMMM! Now, I think the best part about these is that they were enjoyed by all. Exhibit 1 is a montage of my brother, Brandon, devouring his cupcake!!! I can't help but laughing at his facial expressions! 
We had some strawberry buttercream frosting left from this post and we managed to make little cupcake sandwiches that were devoured as well! Even our cat, Mo, had some!

So next time your family is over and someone is craving some simple chocolatey deliciousness, promise, promise, promise me that you will give these a try! Pinky promise!!!! 

I hope you are all enjoying a wonderful weekend now that the rain has finally stopped! 

Happy weekend-ing and happy baking! 

t
xoxo


Monday, August 13, 2012

What am I... REVEALED!

At the beginning of July, I posted this link with a photo of a recipe in progress. Just to recap, this is the picture that I posted both on the blog as well as on my personal Facebook page: 
 I got some really interesting guesses and someone did finally figure out what this was a photo of.  

This is the base of my very first batch of strawberry ice cream! I typically get into the groove of making ice cream particularly during the summer months. Last summer I made coffee ice cream (which was amazing!) and a double chocolate mint ice cream (vanilla ice cream infused with mint from my chocolate mint plant and then white and dark chocolate chunks in it). 

Lately, I've been craving very fruity based things and with two amazing farmers' markets as well as local farms in my reach, how could I not use what I have in my grasp? I'd picked up some local beauties and knew that their sole purpose would be to make ice cream! I found this amazing recipe at Blissfully Delicious that I knew would be just what I was looking for. It's simple, straightforward and looked heavenly. I will admit that beyond the above picture, I don't have any pics except for the finished product (yup, another case of food blogger-cide!) I promise, the recipe will guide you through everything you need to know :)

Here goes:

Recipe borrowed from Blissfully Delicious and is adapted from David Lebovitz via Fine Cooking

Ingredients
2 cups heavy cream
1 cup whole milk
3/4 cup granulated sugar
Table salt
5 large egg yolks
1 lb. fresh or frozen strawberries, trimmed, pureed, strained, and mixed with 1/2 cup sugar (or less, if your berries are very sweet) - I actually skipped the straining, added some small chunks of strawberries into the puree and I only added about 1/4 cup of sugar as my berries were gorgeous!

Directions
  • In a medium saucepan, mix 1 cup of cream with the milk, sugar, and a pinch of salt. Warm the cream mixture over medium-high heat, stirring occasionally, until the sugar dissolves and tiny bubbles begin to form around the edge of the pan, 3 to 4 minutes.
  • Prepare an ice bath by filling a large bowl with several inches of ice water. Set a smaller metal bowl (one that holds at least 1-1/2 quarts) in the ice water (be sure to use a metal bowl, it helps cool things down even faster). Pour the remaining cup of cream into the inner bowl (this helps the custard cool quicker when you pour it in later). Set a fine strainer on top. Whisk the egg yolks in a medium bowl.
  • In a steady stream, pour half of the warm cream mixture into the egg yolks, whisking constantly to prevent the eggs from curdling.
  • Pour the egg mixture back into the saucepan and cook over low heat, stirring constantly and scraping the bottom with a heatproof rubber spatula until the custard thickens slightly (it should be thick enough to coat the spatula and hold a line drawn through it with a finger), 4 to 8 minutes. An instant-read thermometer should read 175° to 180°F at this point (My thermometer's battery has died so I just relied on the running my finger on the back of a wooden spoon test and all was well!) Don’t let the sauce overheat or boil, or it will curdle. Immediately strain the custard into the cold cream in the ice bath.
  • Cool the custard to below 70°F by stirring it over the ice bath. Stir the strawberry puree into the cooled custard.
  • Refrigerate the custard until completely chilled, at least 4 hours or overnight. Then freeze the custard in your ice cream maker according to the manufacturer’s instructions.
  • Transfer to an air-tight container, and freeze for at least 4 hours or up to 2 weeks.
  • NOTE - This recipe made too much mixture for my Cuisinart Ice Cream Maker so unfortunately we had to eat some of it like it was a milkshake. Not a single person in my house complained!!!
I ended up loving this so much that I made it again a week later! My Dad, who doesn't do desserts EVER, claimed that this was as good as Haagan Dazs' Strawberry ice cream. I'll allow a bit of that to be related to me being his daughter, but otherwise I will take his honest opinion.
I absolutely love seeing the chunks of strawberry in the ice cream. It made it all that much better. Please, please, please say that you will try this recipe soon!!! It's worth it, I promise.

Hugs to you all and happy Monday!

t

Tuesday, July 31, 2012

Baby Shower Cupcakes with Strawberry Buttercream


Photo courtesy of Zazzle.com

I'm just going to come out and say it! I LOVE STRAWBERRIES!!! With the crazy weather we had at the end of the winter and the beginning of the spring, the strawberry crops haven't fared well at all this year. This in itself breaks my heart but I do enjoy when I can get my hands on some tasty berries regardless. In celebration of the delicious berries that I picked up at Strawberry Creek Farm a few days ago on the way home from the cottage, I thought that this was the perfect opportunity to try out a recipe that has scared the pants off of me for the last 3 or so years... Strawberry Meringue Buttercream!!!!

Let me explain that typically I use a few different kinds of frosting. When I bake cupcakes and know that I will be transporting them all over the place, I use a recipe that can withstand temperature changes. Other times I use a simple recipe of butter, icing sugar and whatever flavouring I'm looking to achieve. I rarely make a traditional buttercream that requires egg whites to be heated and then whipped for ages before adding a ton of butter. These buttercreams are called meringue buttercreams. I have successfully made a chocolate one before and have tried the strawberry one before but needless to say, I ended up crying because it flopped... or so I thought....

Dina, a friend of ours, first introduced me to this strawberry meringue buttercream and so what better place to start than in her kitchen watching her make it. After watching the master at work, I realized that the last time I made this strawberry buttercream, if I'd just kept beating it, I would most likely have been successful!!! (UGH! Good to know NOW!) Regardless, the ever gracious Dina showed me everything I needed to know and truly boosted my confidence to try again. Thus, when my darling friend Katie (from work) asked me to bake cupcakes for a baby shower she was hosting, I knew that the strawberry meringue buttercream needed to happen.
I apologize for the over exposure but I wanted to show you the cutest baby bottles that I found to top the cuppies!!!
While I won't go into great detail on the recipe, I will summarize the process:
  • Puree strawberries & strain (or not)
  • Heat egg whites and sugar to a point where you can only hold your finger in them for 10 seconds before wanting to cry
  • Whip the egg whites (hopefully with a stand mixer) until cool and huge and fluffy!
  • Add butter in very small additions. When the frosting looks like it's curdled, keep whipping!!!!!
  • Add your strawberries (and a tiny bit of strawberry flavouring)
  • Savour the deliciousness that you have just slaved over!
 I won't lie, I almost cried!! These cupcakes turned out beautifully!!!! On top of their appearance, they tasted heavenly. I made half of them just my plain vanilla cupcakes and the other half were red velvet. The strawberry buttercream was delicious on both!!!

Welcome to my heaven:
 We can all die and go to strawberry buttercream heaven! A special thank you to Dina for making sure that I was comfy with this recipe!!! You rock my socks, lady!!!!

Happy Baking!!!

T

xoxo