Sunday, December 26, 2010

Elmo Birthday Cake!

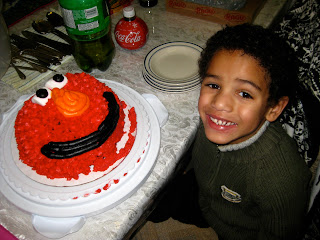
On December 22, 2010, my youngest brother, Jordan, turned 5! I can't believe that it's been 5 years already since he was born and I'm officially at the point where I can't remember what our lives were like without him. In honour of his birthday, I decided to make him an Elmo cake :)

I wanted to use a hemisphere cake pan so that it would be a life-like visual of Elmo's face. I bought Fat Daddio's 8in hemisphere cake pan from Golda's Kitchen and followed the staff's instructions to bake the pan on top of a round cookie cutter so it's balanced while on a cookie sheet. I thoroughly greased the pan because I wasn't sure how it would stick if I didn't. Allow me to tell you now from experience that you must grease the heck outta this pan! GREASE UNTIL YOU CANNOT GREASE ANY MORE! And then, grease it up a little more. I used butter which was great except that a chunk of the cake didn't come out of the pan. Not a huge problem as I was able to put it back together in the end but I still would have preferred a smooth balanced cake.

Anyway, once that was done, I used a Wilton 1M star tip that looks like this:

Photo Courtesy of CakesUnlimited
With the 1M tip, I piped the red frosting all over the cake in connecting stars.


Then I cut 1 jumbo marshmallow in half for the eyes and piped some black frosting on using a Wilton #12 tip. I have discovered that using AmeriColor's Super Black colouring is AMAZING! 


After that, I added his nose and mouth. I may have overdone the nose a bit and should have used a stencil for his mouth but I'm happy regardless. Here is the finished cake :)


And one better, here is the birthday boy with his special cake. Please disregard the smushed icing on the front of the cake... We had a little incident! OOPS!


Keep baking!

tamara

Christmas Around Our House

I feel bad because I really haven't been posting much this month and this month in particular has been filled with food! So here are some photos of what I've been up to over the last few weeks!

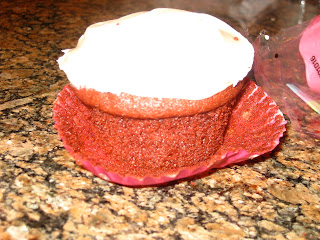
Cream cheese filled red velvet cupcakes

Unfilled red velvet cupcakes

Frosted red velvet cupcakes

Buttermilk apple spice loaf

A slice of buttermilk apple spice loaf

Toblerone shortbread

More Toblerone shortbread

Mushroom, caramelized onion and chicken risotto

A slab of chewy homemade caramel

Sliced chewy caramels (which were later covered in chocolate & sprinkled with pink sea salt)

Veggie cups

Cheese platter

Goat cheese crostini with caramelized onions and grape tomatoes

Christmas Cupcakes - Earl Gray Orange Cupcakes with Orange Buttercream Frosting

COOKIES!!!!!!!! Upper - Toblerone shortbread, Lower - Chewy chocolate chip & Mayan chocolate sparklers

More Christmas cupcakes

Mini tart shells

More tart shells

Ricotta filling for caramelized onion mini tarts

Mini tarts awaiting onion topping

Caramelized onion and ricotta tarts

Creamy mushroom mini tarts
And that ladies and gents is what I have been up to for the last few weeks! 

Happy Monday (almost!)! 

Tamara

Chicken Penne Alla Vodka

I hope you all had a very merry Christmas and spent it with full tummies surrounded by some amazing company! Our Christmas was busy this year but we still had a very busy week! Needless to say, boxing day turned out to be quite quiet and dinner was really an idea on the back burner.... We had TONS of leftovers but after having it for breakfast and lunch (who can really say no to grandma's cooking at 7am... even if it is shrimp and lobster?!?!?), I didn't want any more.

So naturally, in my 'nerd-dom' on this quiet night, I decided to categorize my bookmarked recipes and came across the Pioneer Woman's recipe for Penne Alla Vodka. Firstly, if you don't know who Ree Drummond: the Pioneer Woman is, I am so sorry! She is an all around GODDESS! She cooks, she is an amazing photographer, a fantastic Mum and all around goddess! Discover her blog, enjoy her blog and follow every word as if it were gospel! She's humorous in her writing and I think that's what makes me adore her and her blog! Anyways! Ree's recipe for Penna Alla Vodka inspired me to whip up a quick batch for those of us who hadn't had dinner tonight... Can I tell you that I am so glad that I did it?!?!?

The recipe is really straight forward and I will apologize now for not having taken step-by-step photos like Ree does (and as I typically do). Pretty much heat some butter and olive oil in a pan set to medium high heat. Add a whole medium sized onion (diced) and a few cloves of garlic (I used 4 because I'm a saucy gal like that!). Let the garlic and onion soften and then add in 3/4 cup of vodka (we had Absolut on hand, but use what you have). Let the vodka reduce for a few minutes. Add one can of crushed tomatoes (I used a can of whole tomatoes that I pulverized with my emulsion blender) and a can of tomato paste. Keep stirring until it's all combined. I added some dried basil and oregano (about a teaspoon of each), some Spicy Pepper Medley and a few dashes of Frank's Red Hot Sauce. Now comes the fun part... Add some 35% whipping cream... I added about 3/4 of a cup. Mix and let it all simmer to deliciousness for about 5 minutes. Add your cooked penne (and in my case, some cooked chicken) and stir!

In the end, you should end up with something that looks like this :)


And voila! Delicious and quick and easy and wonderful!

Happy Monday!

tamara

Saturday, December 4, 2010

Cookies GALORE!

Happy December Everyone!

It seems that two years ago my Mum and I started a new tradition of baking cookies and giving them to guests who stop by during the holidays or as hostess gifts if we go to visit someone else's place. I very clearly remember there being a day of hell-ish baking when we baked all of the cookies all at once. Needless to say, by the end of the day of baking, I was THRILLED to see those cookies leave our house!

This year, I decided to get smart! I had a day where I was home alone and I was feeling my inner 'Martha/Julia' speak to me... they both said "Get a move on on those cookies now, sister! Roll and freeze em missy!". When those voices speak to you, you listen because THEY know best! And that's exactly what I did. I made a single batch of our favourite Christmas cookies, Robin Hood flour's Mayan Chocolate Sparklers, and a double batch of their Ultimate Chocolate Chip Cookies too! I have made both of these cookies before and I love them both dearly! Both recipes are pretty simple  except that the Mayan Chocolate Sparklers are best done with a 5 year old or two helping you so that you don't have to do all of the rolling of cookies on your own. BUT alas, I flew solo on this mission. 

For the Mayan Chocolate Sparklers, I creamed together the butter and shortening...

And then added some sugar (both brown and white) and some eggs...


Then added some flour, cocoa powder, cayenne pepper, black pepper, cinnamon. Mix until it comes together (I promise it will come together!!!!! If it doesn't, you probably forgot to add the eggs...not that I've done that in the past or anything...... dum dee dum)!


And then stir in some delicious chocolate chips...


Now here comes the fun part. DO NOT do this in the kitchen as you will be bored to tears (unless you have a friend to chat with). I set up camp in my living room with a baking sheet, a mini ice cream scooper, and a bowl with cinnamon sugar. Scoop your batter and then roll it in cinnamon sugar and place it on your cookie sheet. Repeat 35000000 times and then you're done :) This is the point where I threw my cookie sheet in the freezer for about 20 minutes so that the cookies could freeze hard enough to be put in a plastic bag until I was ready to bake them off. Here they are, fresh from the freezer...


As for the chocolate chip cookies, I also positioned myself in the living room and just attacked the double batch the same way I did the Mayan Chocolate Sparklers. Look at em go! 


Since I am on a cookie mission at the moment, I will post some more cookies as they happen in my house. I hope you all are having a WONDERFUL Saturday afternoon and that you're not all stressed out about the holidays! 

Happy Ho Ho! 

Tamara

Sunday, November 21, 2010

Perspective

Every once in a while, I get the feeling that I need to put things back into perspective. Some people take a walk, some people let out some aggression, and I... go back to really basic and simple things in the kitchen. Allow me to explain. 

A few weeks ago, I had come home from a really crazy day at work and I just wanted to forget that the day ever happened. It was one of those days where I just felt like nothing I'd done was productive or actually made a difference. So naturally, I came home... and whipped cream by hand.  

Now, while you may not think this is a big deal, may I suggest that you go and whip a cup of 35% cream with a whisk. Let me explain why this act is an excellent way to put your life back into perspective. The cream, while you whisk it, shows you that your efforts of adding air into the cream are actually doing something to change it's state. While your arms with throb, words cannot describe the wave of satisfaction that comes over you when that cream starts to look fluffy and delicious. Before you know it, your mind is so focused on the cream that nothing else matters and you know your world is back on track!!!!! There is something so humbling and wonderful about seeing your actions having a direct reaction. I'm telling you, I swear by this... 

Photo courtesy of Info Barrel
I hope you all had a wonderful weekend and I promise to have a new recipe post up soon :) 

Happy soon-to-be Monday! 

tamara

Friday, November 12, 2010

I have died and gone to mac n' cheese heaven!

A few months ago, while visiting my darling friend, Jessica, I had the absolute pleasure of eating some of the BEST macaroni & cheese that I have ever tasted! What made it better was that it was baked and had plenty of crunchy cheese and breadcrumb bits and needless to say, it was divine! So, naturally, I begged for the recipe as I was told that it had a slightly non-traditional ingredient and I was highly intrigued!

I must admit that I have had the recipe for about 2 months now but didn't get around to actually testing the recipe myself until recently. Jess' Mom was kind enough to e-mail me the recipe as best as she can remember (Thanks, Mrs. K!) so I hope that I am doing her recipe justice! I warn you, this recipe makes a lot of mac n' cheese!

Mrs. K's Mac n' Cheese:
  • 1 box of elbow macaroni (I used Catelli Smart Macaroni)
  • 1/3 cup butter
  • 1/4 cup all-purpose flour (I tried this with whole wheat flour and it definitely left a slightly grainy texture to the sauce, so I would recommend skipping the whole wheat flour)
  • salt & pepper to taste
  • 1/2 tsp dry mustard - or in my recipe, garlic powder
  • 4 cups milk - I use 1%
  • 2 oz cream cheese (half of a brick), cut into 1 inch pieces
  • 4 cups grated old cheddar cheese, plus some more for topping the casserole
  • 1/4 Italian (seasoned) breadcrumbs
Start by cooking a box of macaroni as per the package instructions, though I would recommend to only cook the noodles to al dente because they will cook more in the oven. Once the macaroni is cooked, drain and reserve them in a large pot until the sauce is ready. 


In a medium sauce pan on medium high heat, melt butter. Once melted, stir in flour, salt & pepper and mustard (or garlic powder... or both!) and let cook for 1 to 2 minutes, stirring continuously, until smooth. You don't want any lumpy bits left from the flour. Slowly pour in the milk and continue to stir constantly until the sauce thickens. 


Add the cream cheese to the sauce and the grated cheddar cheese. 


Stir until completely melted. You may need some extra elbow grease here since the cream cheese can sometimes take a little longer to melt.


Once melted, add your cooked macaroni and mix until combined. 

Transfer the mac n' cheese to a casserole dish (I used a 9in x 9in x 3in dish but use whatever you have on hand, just make sure it's deep enough to give you a nice slice of mac n' cheese goodness). Top with a little more grated cheese and breadcrumbs.


Bake at 375F for 35-45 minutes or until the top is nice and browned and crunchy and just amazing! It should look something like this:


May I also suggest baking it on a cookie sheet just in case things get so excited and spill over the edge of your casserole dish (as mine did)... Enjoy the heavenly bliss that is this DIVINE mac n' cheese!

NOW for the exciting part!!!!! On my second attempt at making this, it was suggested to me by my darling friend, Julian, that we try making a Mac N' Cheese Lasagna... Allow me to explain. Envision a lasagna but substitute a layer of the above mac n' cheese goodness for the lasagna noodles. You would still layer in sauce and cheese over the macaroni mixture and I promise you, it's AMAZING! This was our dinner on Wednesday night! Gotta love cheese! 


I hope you have enjoyed the cheesiness of my last few weeks! 

Happy Friday and Happy Cooking! 

tamara

Sunday, November 7, 2010

A Return to the Blog

I have been trying to figure out how to word this post or how to get back into the groove of blogging after the last few weeks' events. While I promise I haven't stopped cooking (really, I haven't), I just haven't quite been able to find the words to say what I wanted to say in this post. So this is my attempt to find the right words and try to get back into the groove. 

My family has always been a vital part of my life and I have been very lucky to have the majority of my family still around and still playing an active part of my life. Unfortunately, this took a turn a few weeks ago when my Dido (the Ukrainian word for grandpa) was admitted to the hospital. He has been ill for a while but I, at first, just thought this was a little hiccup on our family's path. However, things didn't quite work out that way and on October 20, 2010, he passed away after 5 days surrounded by my Baba, all of his kids and the majority of his grandchildren. While it was hard, it was also a slight relief to no longer watch him suffer as he had been in the hospital.

Baba, Dido & I at Ukrainian Christmas in 2005.
Anyway, as I said, I have definitely been cooking along through these last few weeks but I haven't had the chance to blog. As anyone who knows me well enough (and maybe even those who don't know me well), the kitchen is my haven. It's where I go to relax and to forget about the 500000 other things going on in my life. As corny as it sounds, it's the one place where I can just go and be. And as such, without further delay, here is what I have been up to.

A couple of weeks ago I tried red velvet cupcakes for the first time and thought they were a little strange. I think my sentiments were that they didn't really taste like anything; not chocolate, not vanilla, not really anything and I was disappointed. My disappointment went even further because it was a Martha Stewart recipe and they're usually pretty flawless. However, I decided to try them again just to give Martha a second shot. Well... They were pretty awesome and the only thing that heightened that awesomeness to the next level was the cream cheese frosting that went on top of these beauties!


You must check out the recipe for these delicious little bundles of chocolately love but I have a few suggestions... Firstly, here is the recipe (click here)

My few suggestions would be that you use a higher quality red food colouring than one can typically buy at the grocery store. I find that the colouring that you can get at the grocery store either means that you're going to have to use the entire bottle of colour and it has a tendency to make things taste funny when you're using such quantities. For this batch, I used AmeriColor dye in Red Red. It's a soft gel paste food colour and it's wonderful. Secondly, when the recipe tells you to add the vinegar and baking soda mixture, let it fizzle and calm down a little bit before you mix it in the batter... I PROMISE this is a vital step that my darling Martha doesn't really mention. When I added my mixture, it still had some bubbles but it wasn't like I was pouring club soda in to my batter. 

Speaking of Martha, I also had the chance to make her Meyer Lemon Cupcakes with Lemon Curd filling. I couldn't find a direct link to Martha's website, so I found iVillage's posting of the recipe here.  I'm not sure if I want to use this lemon curd recipe again, or maybe if I do, I will need to let it set more first because it was hell on wheels to pipe it into the cupcakes. Regardless, I did top them with the same cream cheese frosting that the red velvet cupcakes used and it just made them that much better... How can you resist these?!?!?!


While I do have a few more things to share, I think I will hold on to them for a few days so that I can share that with you as well. I apologize for the silence over the last few weeks and hope that some of you are still following along on this fun little journey despite our little hiatus! 

Happy cooking! 

td