Showing posts with label family. Show all posts

Sunday, October 28, 2012

Roast Chicken for 4... or 2... or 1!

A few weeks back (oh boy, it's actually been 2 months!!!) I was home alone for a whole week and let me tell you it was heavenly! I became a bit of a Suzie Homemaker and spent my time baking, cooking, sewing, knitting and all in all just having a pretty amazing time doing whatever my little heart desired. On one of those lovely nights, I made the most delicious roast chicken dinner for me, myself and I. This meal could definitely feed multiple people or a smaller number of people for multiple meals.

A roast chicken is truly one of the easiest yet most satisfying things to make. It's so versatile because you can customize it to exactly how you like your chicken to taste. Like things more spicy, DONE! Want some herb flavoured chicken, DONE! Not sure what to do with the spices in your cupboard, slap them on a chicken and roast it! It is one of those things where you can't really go wrong with the seasoning. I know that most times it's very very easy to simply pick up a pre-made roast chicken for dinner but in just over an hour's time (depending on the size of your chicken), you can have a gorgeous little roasted bird waiting for you without all of the other 'funny bits' that are sometimes included in store-bought roast chickens. Also, if buying a bulk package of roast chickens (Costco sells 3 packs), you are definitely saving in the long run. Throw the extras in the freezer and you've got a whole bunch of meals ahead of you. You could even pre-season your chickens before freezing which would make them THAT much easier.

Years ago, my Mum attended a 
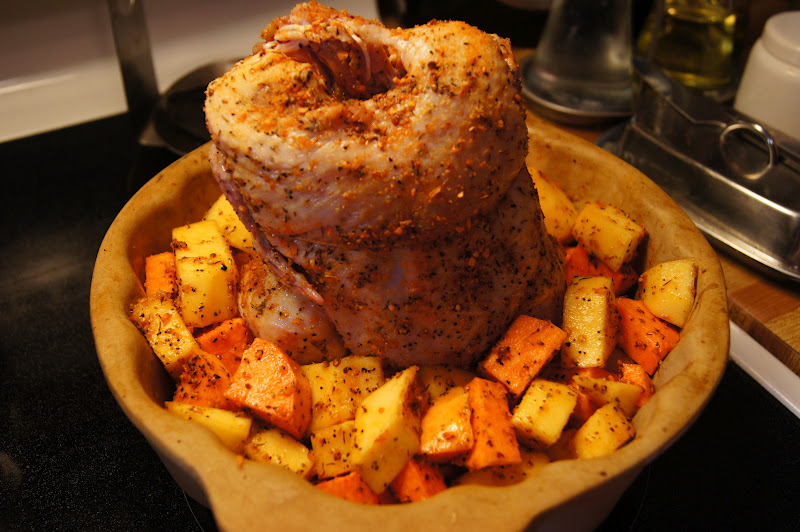
Pampered Chef party and came home with a bundt pan with a covered centre (aka no hole in the middle). On the particular night that I was roasting my little chicken, I decided that I would use whatever spices we had in the cupboard but I also wanted to try a new veggie with it. So I picked up a lovely little acorn squash and added it to my sweet potatoes for some variety. Acorn squash is quite lovely, I will admit and will definitely make more frequent appearances in my kitchen in the coming months.
This is the point where I had cut up all my veggies and put them in the bundt pan before I realized that I forgot to spice them up... UGH! Into the bowl they go for a little spice bath!
This was the cute little chicken that I found at the grocery store.
Pop your little wonder chicken on the center tube of the bundt pan so she stands up all proud and such
My spice blend of choice for that night... But I truly say do what feels good!
All dressed up and ready to party!!!
Add the veggies around your chicken before baking. Everything will cook and mix and be amazing!
HEAVEN!!!

Let it rest for a few minutes after baking (I covered it with some foil)
Once all veggies are removed from the bundt pan, take the liquid in the bottom and heat it quickly in a sauce pan. It will make a glorious sauce that just makes life make sense again.
Serve with broccoli and whatever else rocks your boat! Enjoy the sauce too!!!!
I promise as much as this seems both like a labour intensive dish but it isn't and it is worth every second of it. Try this! Try this! Try this!

I'm sorry for my distance lately.... As always the insanity of every day life has caught up with me but I'm trying to get a bunch of posts ready for the next few weeks!!! Plus, Christmas baking is already being planned and I can't wait to share it with you all!

Hope you're having wonderful Saturday nights!

xoxo

T

Monday, September 10, 2012

Chocolate Cupcakes on a lazy Sunday evening!

A few weeks back, on a rare occasion, all of the grown children of my household were home (barring 1 girlfriend - T-bear, you were missed terribly!!). This sort of thing never happens as we're all in our 20s and usually all over the place. My brother is typically at school somewhere in the US, my step-sister in past years has been at school in Kingston, and I'm just all over the place. Needless to say this was a big deal!

While we were prepping dinner and catching up on what was going on with everyone, my step-sister mentioned that she had a craving for a simple chocolate cake with plain chocolate frosting. Apparently this is hard to come by which I find to be insanity! How can no one make just simple chocolate cake with chocolate frosting any more? Have we really become so entertained by all of the crazy cake flavours out there that we've forgotten that sometimes the simplest things are the best? Before I go off on a huge tangent about simplicity in the kitchen, I digress!

So to help the poor girl out in her quest for chocolate cake, I decided to whip up a batch of Martha Stewart's One Bowl Chocolate Cupcakes. I was fascinated by the claim of these actually only using one bowl and truth be told, it worked... Well... one bowl and one sifter but still! This batter takes all of 5 minutes to mix and produces results comparable to cake mix without all the added grossness that goes into mixes. The ingredients were all found in my kitchen and I think it's safe to say that they would be found in most other kitchens too. I cannot stress this enough... GO MAKE THESE CUPCAKES! You will not regret it one single bit! 
These little beauties have the most gorgeous shiny tops ever. They are good enough to eat sans frosting even!
The cupcake liners don't hurt either! You can never go wrong with polka dots!


Once we had the cupcakes made, it was time to frost these babies up with a simple chocolate frosting. My frosting was made with butter, icing sugar, a few tablespoons of cocoa powder, some vanilla bean paste (or you could use vanilla extract) and a touch of milk. I know that usually I am religious at piping my frosting but sometimes you have to live a little and just do what feels right. These were not cupcakes for an order, they were cupcakes for a family dinner in the backyard while playing (slightly intoxicated) ring toss on a 6 foot tall Eiffel tower.

All I can say is YUMMMMMM! Now, I think the best part about these is that they were enjoyed by all. Exhibit 1 is a montage of my brother, Brandon, devouring his cupcake!!! I can't help but laughing at his facial expressions! 
We had some strawberry buttercream frosting left from this post and we managed to make little cupcake sandwiches that were devoured as well! Even our cat, Mo, had some!

So next time your family is over and someone is craving some simple chocolatey deliciousness, promise, promise, promise me that you will give these a try! Pinky promise!!!! 

I hope you are all enjoying a wonderful weekend now that the rain has finally stopped! 

Happy weekend-ing and happy baking! 

t
xoxo


Tuesday, February 21, 2012

A Very Hungry Caterpillar & A Very Happy Birthday Boy


I feel like it's been forever since I've posted something for a cake order that I've had! My little brother's birthday was in December (poor bug was born right before Christmas) and we postponed his birthday party until recently just so that the Christmas hullabaloo would be over and done with.

When chatting with a 6 year old about what they'd like their birthday cake to look like, your conversation can truly go in soooo many directions. Jordan loves Pokemon, Iron Man, Spiderman and all sorts of other things that I'm a little clueless on when it comes to cakes. However, I remembered coming across a post from the My Cake School Blog about making a Very Hungry Caterpillar cake out of cupcakes. It looked pretty straightforward and Jordan and I used to LOVE reading the book together. So truly this was a no brainer that this was the cake for him!

Start by arranging your cupcakes (including a larger one for the head) and frost random blobs across the gaps of the cupackes
Smooth the icing as best as possible and let it crust for 10 minutes before smoothing it with waxed paper.
Go a little crazy with the designs you include on each section and don't forget to add the chocolate chip feet!
Et Voila! Very Hungry Caterpillar Cupcake-Cake
The boy child truly enjoyed his cake! I mean look how excited he was with his buddies!!!

Wednesday, October 26, 2011

Mushroom Turnovers & a Busy Weekend

I truly can't believe how quickly this past weekend flew by. I look forward to being able to just relax and veg for a bit and unfortunately this was not one of those weekends. However, it was full of adventures all around that made it all worth it.

Friday night was spent with my baby brother, Jordan, who will very politely and proudly tell you that he is "5 and three quarter years old". We had a sibling sleepover which was full of mac'n'cheese (Mrs. K's recipe) and movies and snuggles all around. Honestly, how cute is he!!??!?
Then, on Saturday morning we headed to Andrew's Scenic Acres to pick out some pumpkins. I learned the hard way that when going to get pumpkins at the patch, bring more than on adult because almost 6 year old children do NOT like to help carry pumpkins. That being said, we did have quite the adventure :)


After our patch adventure, there was some serious pumpkin carving (photos to follow) and then I headed off to the Delicious Food Show at the Better Living Centre in Toronto. I promise there will be an entire post about it within the next few days.

On Sunday, our family got together to remember my Grandfather (my Dido) since it's been a year since he passed away.
Baba, Dido and I in early 1989
We had a lovely lunch together and I whipped up some mushroom turnovers to bring over to Baba's house. I'm sorry to say that I didn't take any process pictures but the end result was delightful.

Here's the quick rundown of how I made them.
  • Bring your puff pastry to room temperature (frozen puff pastry makes this RIDICULOUSLY hard to say the least). 
  • Slice 1 pint of mushrooms
  • Melt 1 tbsp of oil and 1 tbsp of butter in a saute pan and add 1 small onion and 1 clove of finely chopped garlic. Cook on medium heat until softened. Add 1 tsp of fresh thyme leaves. 
  • Stir in 3 tbsp of marsala wine and 1 tsp of maple syrup. 
  • Add the sliced mushrooms and 1/4 tsp of salt. Saute until the mushrooms are soft and cooked through. 
  • Stir in 3 tbsp of heavy (35%) cream and cook until a thick sauce is made. 
  • Roll out your puff pastry into a 9 x 13 rectangle. Cut the rectangle into 12 square-ish rectangles. 
  • Add one spoonful of filling to the middle and fold the square in half and pinch the edges. 
  • Place on a baking sheet and brush with a beaten egg. 
  • Bake at 400F for 15-20 minutes or until golden brown. 
Ta-Da!
 

Look at the delicious layers of pastry!
I hope you all enjoyed your weekend and that it was slightly more relaxed than mine.

Happy cooking!

t

Monday, July 5, 2010

Soup? Really? On the HOTTEST day in Toronto?

It's true. Today, of all days, I decided to make soup for dinner. I had bought some beets a couple of weeks ago and didn't use all of them and didn't want them to go bad. So, naturally, the only reasonable thing to do was to make some Borscht! 

For those out of the loop, borscht is an Eastern European soup which is typically made primarily of beets. My maternal grandmother has always made an amazing rendition of this soup for the holidays and it is such a comfort food it's not even funny. I think that's why I was craving it; I guess I was just looking for some comfort on this hotter than an inferno day!

While I'm sure my grandmother would screech at me for not making a fully 'authentic Ukrainian borscht", I have to tell you, I may even be almost as fond of my own version almost as much as my Baba's. My version is adapted from the version in The Joy of Cooking with a few twists.

Begin with 1 tbsp of butter and 1 tsp of olive oil in a soup pan. Heat on medium high heat and add in:
  • 3-5 grated carrots (depending on how much soup you want to make and how much carrot you like in your soup), 
  • 1 large red onion, chopped and
  • 3-4 beets, (previously roasted in a 400 degree oven for an hour while wrapped in tin foil)
  • 1/4 cup maple syrup
Stir all ingredients in the pot until the vegetables soften a little bit. It should look something like this.


Add 10 cups of chicken stock and 2 tablespoons of red wine vinegar. I know what you're thinking... 'why am I putting vinegar in my soup?'. Let me tell you that the vinegar makes all of the difference! Let  the soup simmer for 30 minutes. 


I found that after 30 minutes of simmering that I needed to skim the surface of the soup. This stuff is a little gross but completely normal from the stock. Just skim away and it will be delish! 


After skimming, I let the soup simmer for another 15-20 minutes to soften the veggies up a little more and then served it in a mug with some yummy crusty bread! This is the easiest soup to make and the results are so amazing you won't know how you lived without it.


Happy Cooking! 
tamara

Tuesday, May 18, 2010

The Inaugural Post - Coming Home

I have been debating writing this blog for months now... MONTHS! Unfortunately, things like life, school, work and sleep (on occasion) kept getting in the way. Thankfully, school has ended, work is somewhat quieter and sleep is on the rise. This blog is really a gallery of the things that I love to make, the tools I can't live without, the ingredients that make it all work and the poor souls who are typically my guinea pigs for new recipes.

I have always posted my food pictures on Facebook in an album that I have titled My Miracles in the Kitchen. It was a great way to post things but I found that it was just getting to be a bit much when I could only really comment on things in one or two lines, hence why we're here today!

My debate over the last few weeks when I began contemplating my inaugural post was how to start this blog. Obviously I could just yammer on about wanting to write this blog (as I have already done) however I wanted this post to be meaningful. Then, last week, while baking (surprise, surprise!), it hit me! Allow me to elaborate.

I was baking a chocolate cheesecake for my brother who has been away at school since January. We have always been close but over the last few years, not only has he become one of my best friends but also one of my primary taste-testers! It's been weird not having him around these last few months while I've been cooking up a storm. I have missed his ridiculous feedback about my creations; rating them "average at best". While I do enjoy his commentary, I know that there is something comforting about our sibling connection with food. For me, there is something so satisfying in making food for those you love and for my brother, these are the things that make him feel 'home'.

It was only appropriate that my inaugural posting be about coming home to food. My brother has always been an avid lover of cheesecake, regardless of the flavour. A few days before his homecoming, he submitted his request for a Chocolate Skor Bar Cheesecake. His instructions were simple: "Make a chocolate cheesecake, spread some caramel on top and sprinkle on some Skor bits!" Now, while I do love this child more than life itself, time constraints didn't quite allow me to fulfill his list of requests, so instead I opted for the more simple version: A Chocolate Lovers' Cheesecake.
I have just recently discovered making cheesecakes, having made my first one less than 2 weeks ago for my brother's girlfriend's birthday (Happy Birthday T-Spice!). Her cheesecake turned out beautifully and it happens to be the one I snapped photos of!

The recipe was a simple Classic Philadelphia Cheesecake Recipe. It starts out with a simple graham cracker crust (22 graham crackers pulverized in the food processor mixed with a 1/2 cup of melted butter).


Then 3 packages of cream cheese, 3/4 cup of sugar, 1 tsp of vanilla (or if you live in my house, 1 tbsp) are mixed in a stand mixer and blended until combined. 3 eggs are added one at a time with the mixer on low speed. Your mixture should look something like this before you add the eggs.


Pour the mixture into the crust and put it in the oven to bake at 350 F for 40-50 minutes. When mine came out it had a few cracks in it.


I know that I should have used a water bath but I wanted to test drive this recipe first to see how it would turn out. Ironically enough, after allowing it to cool, it deflated a little bit and filled in its own cracks like its own dose of botox!


This one was topped with berries macerated in 1 tbsp of sugar.


For the chocolate variation, I simply followed the Chocolate Lovers' Cheesecake recipe which adds 8 oz of melted semi sweet chocolate after having added the eggs. Sooooo Yummy!

So I think that this is what this blog is more about... the comfort and connection that food provides in conjunction to those we love! Over the next however long, I hope to share more of my creations with you :)

Happy Cooking & Baking!

tamara